
- Upgrade
- Posted
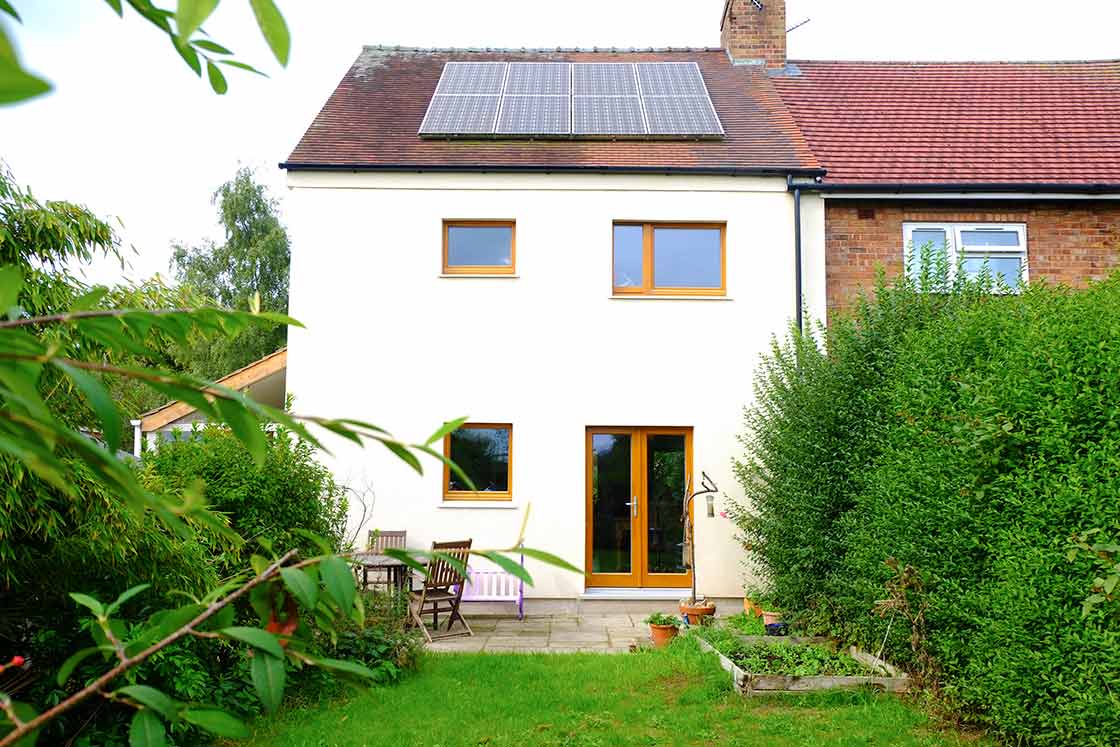
Cheshire semi gets passive retrofit for £60k
Vet Chris Copeman was so meticulous about the deep retrofit of his home near the village of Frodsham that he decided to train as a passive house consultant and project manage the build himself. The result? A certified passive house created on a surprisingly low budget.
Click here for project specs and suppliers
Building: Passive house retrofit to 80sqm 1940s cavity wall semi-d
Location: Frodsham, Cheshire
Completed: 2016
Budget: £60,000
Standard: Passive house certified
£840 a year profit (feed-in-tariff minus energy costs)
With the recent, urgent call from the International Committee on Climate Change to drive net carbon emissions to zero in just 12 years, we have a lot of retrofitting to do. And as even the UK energy department (BEIS) now acknowledges, simply insulating lofts and cavities won’t cut it. We must be doing whole house retrofit – but, somehow, doing it affordably.
And we’re not very good at that yet.
So every single example of whole-house retrofit carried out to date is a valuable part of the learning curve. A retrofit that achieves passive house on a five rather than six figure budget is an especially valuable exemplar. And if the house is identical to thousands of others up and down the country, even better.
Chris Copeman’s home of ten years fits that definition perfectly. It is a modest 1940s three-bedroom ex-council semi, in rural Cheshire, and it was cold and draughty, as so many mid 20th century houses are. Chris and his partner Alex wanted to increase their living space by adding a bedroom in the attic, and most importantly, to drastically upgrade the fabric to save energy and carbon, and make the house comfortable.
Chris had already refurbished commercial premises for his veterinary practice but had found it hard to get really convincing technical advice on energy saving. “After doing research, speaking to people and going on courses, I realised that if you were going to retrofit a building it needed doing to the highest standard possible, passive house,” he says.
And not one to do things by halves, Chris took a passive house consultants’ course himself, so that he could be sure he was on top of every aspect.
This article was originally published in issue 29 of Passive House Plus magazine. Want immediate access to all back issues and exclusive extra content? Click here to subscribe for as little as €20, or click here to receive the next issue free of charge
Like most people, the couple didn’t have a huge amount of money to spend on improving their house. Such a modest property would never allow Chris and Alex to recoup a massive investment, even if property prices continued to rise.
However, they were not about to compromise on quality. The couple are passionate about the urgent need for environmental action, and in particular, the need to slash carbon emissions without half-measures.
And in many ways their very ordinary semi lent itself perfectly to achieving exemplary results – without exceptional outlay.
Minimal simplicity
Architect Gil Schalom, who is familiar with passive house design, was brought in by Chris and Alex to help with the initial designs. As Gil explains: “The core to the project design was minimal simplicity, in order to achieve a very high standard at minimal cost.”
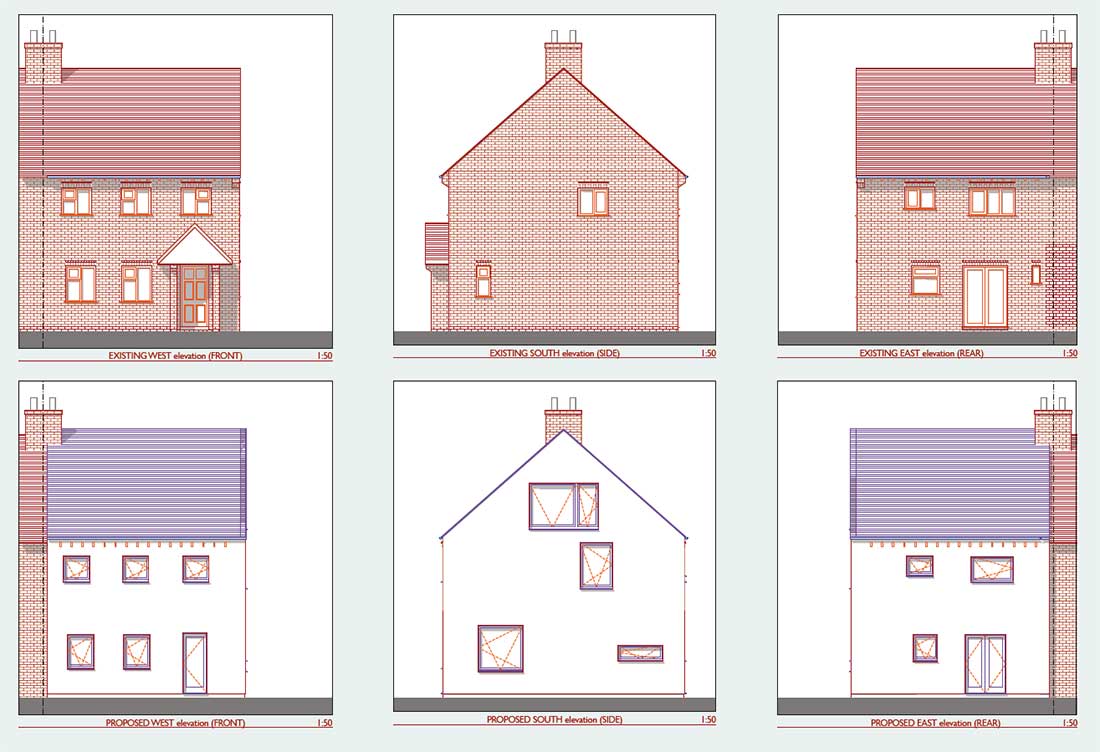
One of the keys to this, Gil says, was to capitalise on the simple shape and relatively good form factor (2.8) of the house. When the floor area was increased from 80 to 100 square metres by adding the loft bedroom, the Enerphit (passive house retrofit) standard target of 25kWh/m2/yr space heating demand was within reach — so Gil targeted this with his design.
Keeping the form factor simple also keeps costs down. For example, adding dorm windows to light the new attic bedroom would have increased heat loss as well as costing money and adding complication – and would also have reduced the area of the existing solar PV array. Skylights don’t perform as well as vertical glazing either.
So, a single south-facing window was introduced into the gable end of the attic space – the cheapest and most energy-advantageous option. Similarly, the new porch is entirely outside the thermal envelope – as well as being re-used (it was an old conservatory).
His familiarity with PHPP meant Chris was able to take Gil Schalom’s Enerphit design and, with the help of certifier Kym Mead, try out a few tweaks, such as modifying glazing and removing thermal bridges.
Eliminating the floor-level thermal bridges by introducing a course of Foamglas low thermal conductivity blocks at the base of the internal walls shaved the final kilowatts from the already low heat demand, enabling the retrofit to meet not just Enerphit, but the full passive house standard.
-
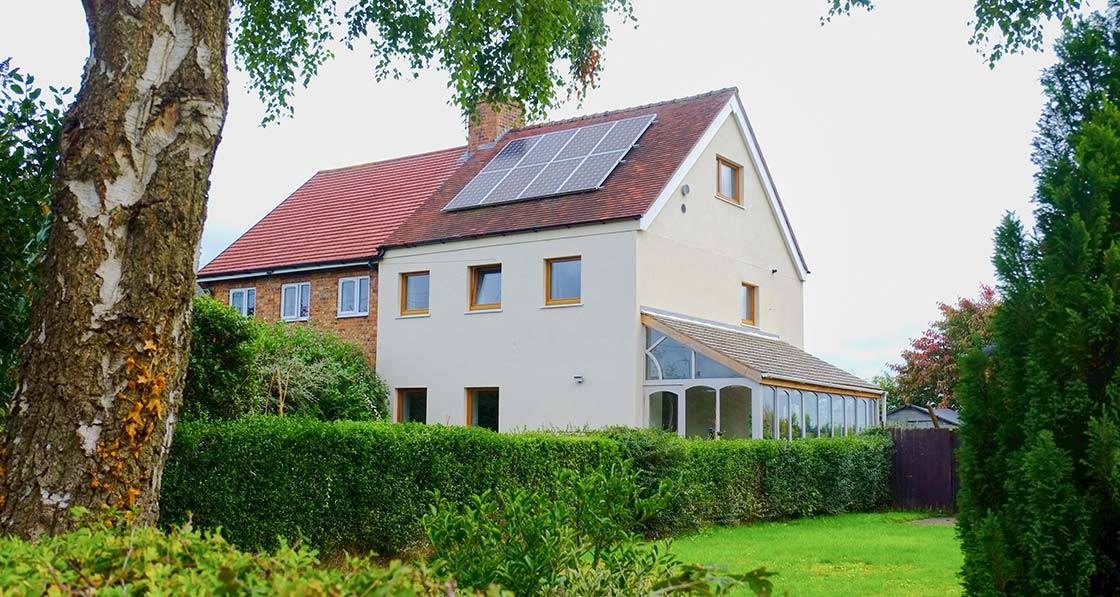
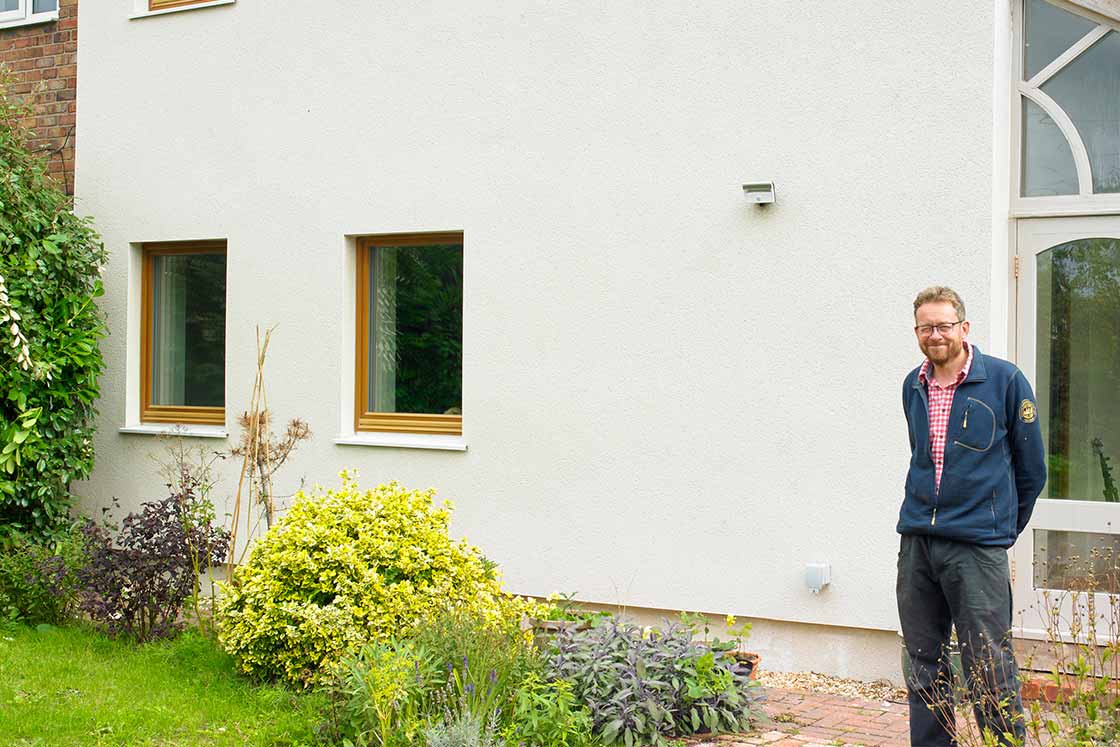
 The front of the house as it was before the retrofit, with solar PV panels previously installed
The front of the house as it was before the retrofit, with solar PV panels previously installed
The front of the house as it was before the retrofit, with solar PV panels previously installed
-
Airtightness taping and membrane around windows, with the original brickwork still exposed internally
Airtightness taping and membrane around windows, with the original brickwork still exposed internally
-
Further taping around joist ends
Further taping around joist ends
-
Paul Focus 200 heat recovery ventilation system
Paul Focus 200 heat recovery ventilation system
-
Gutting the house prior to retrofit
Gutting the house prior to retrofit
-
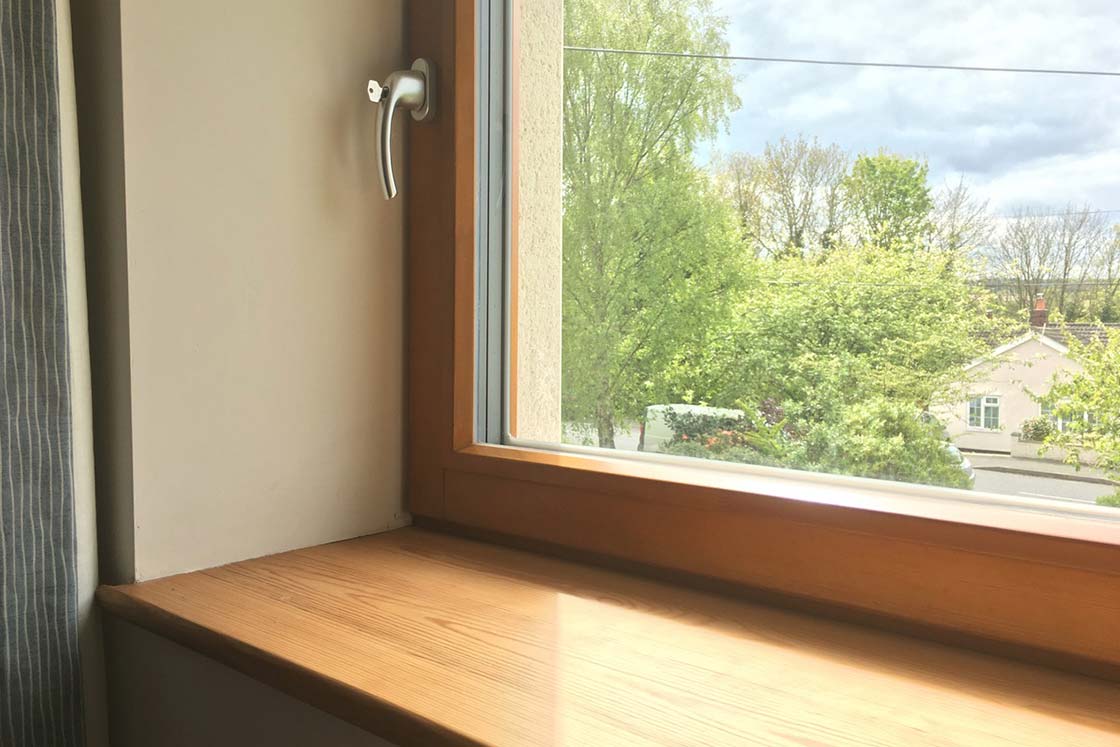
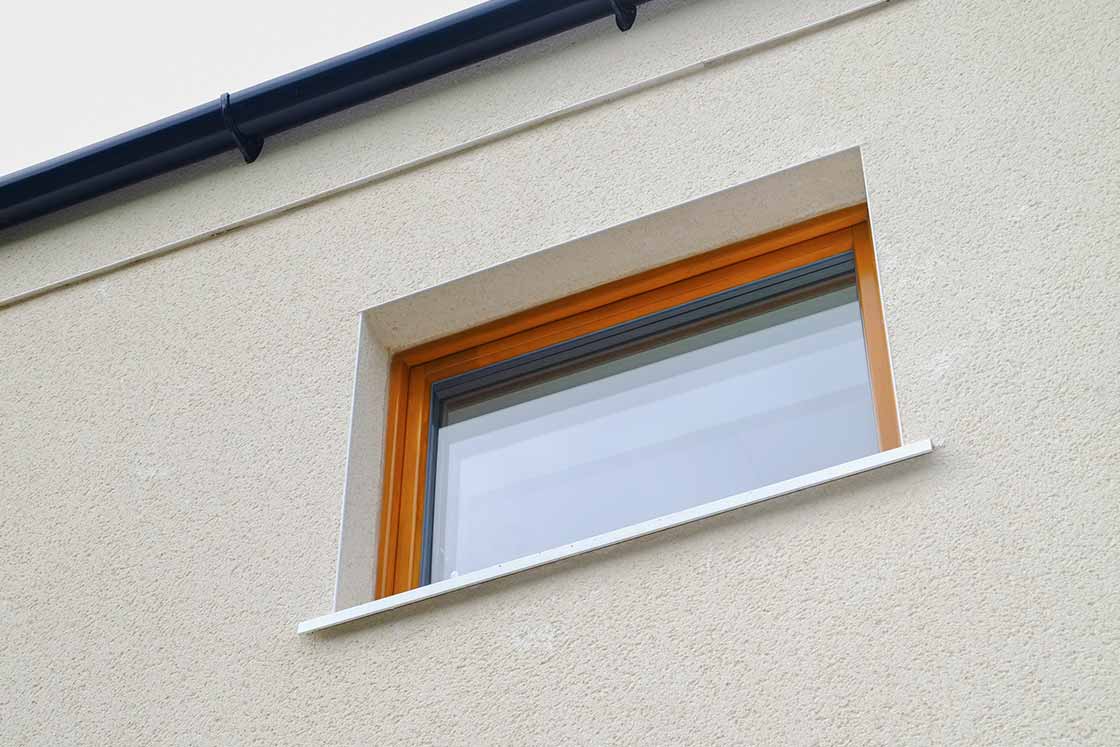
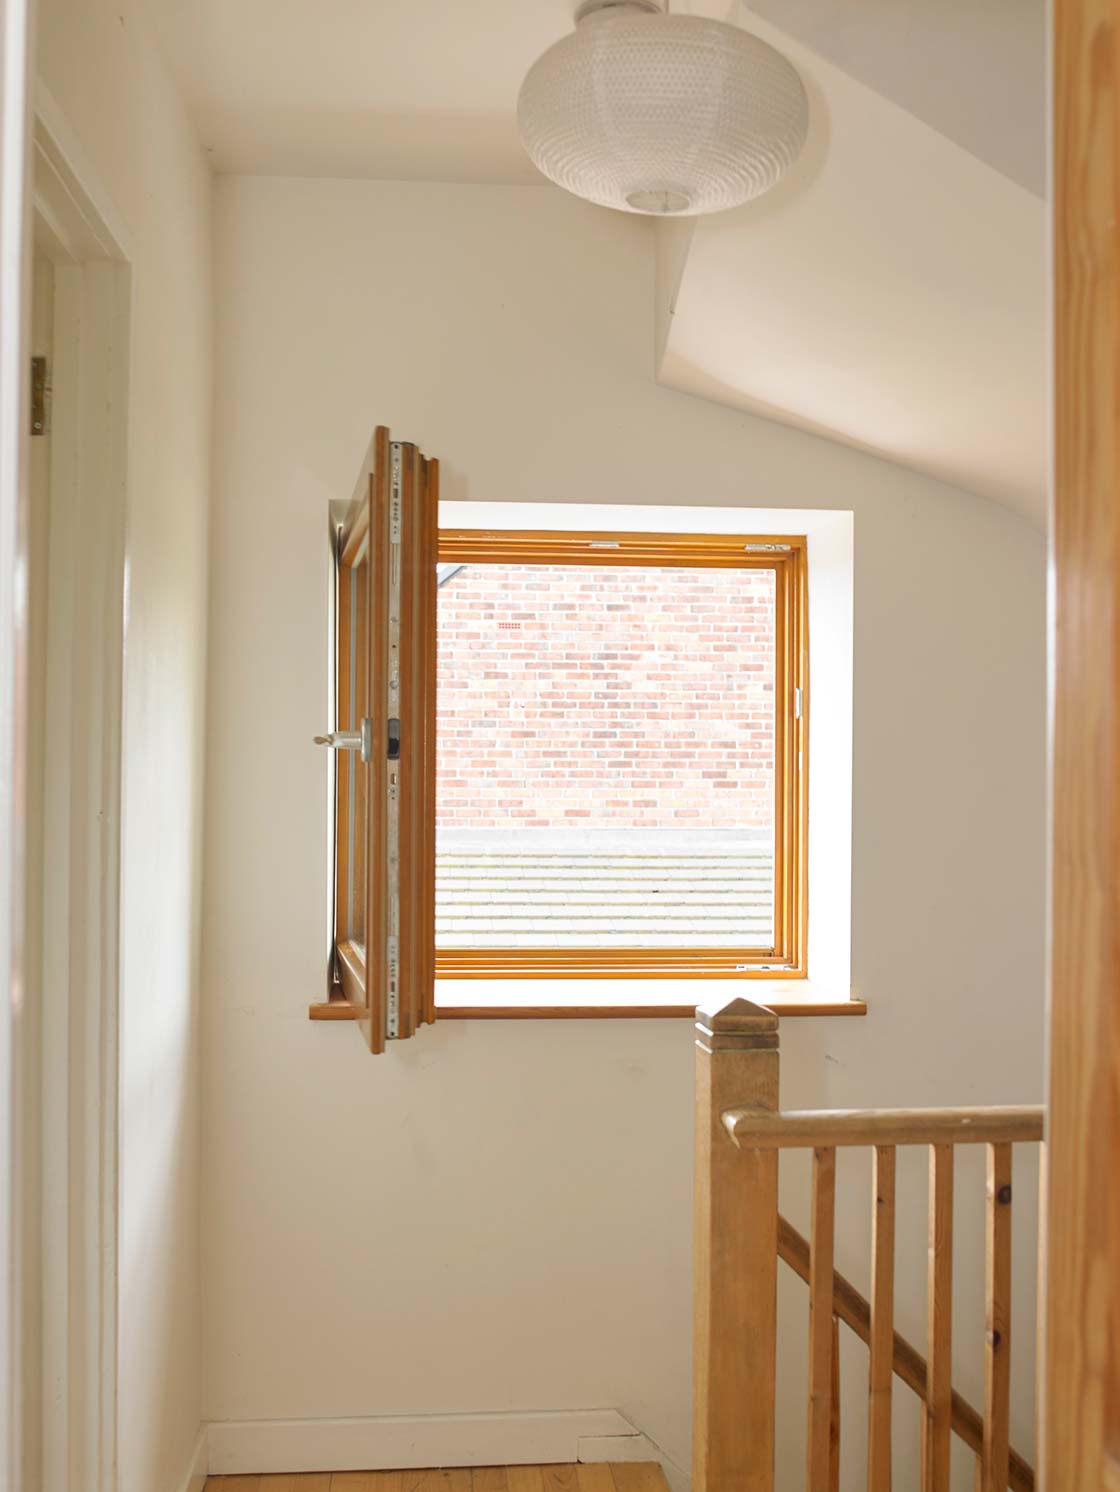
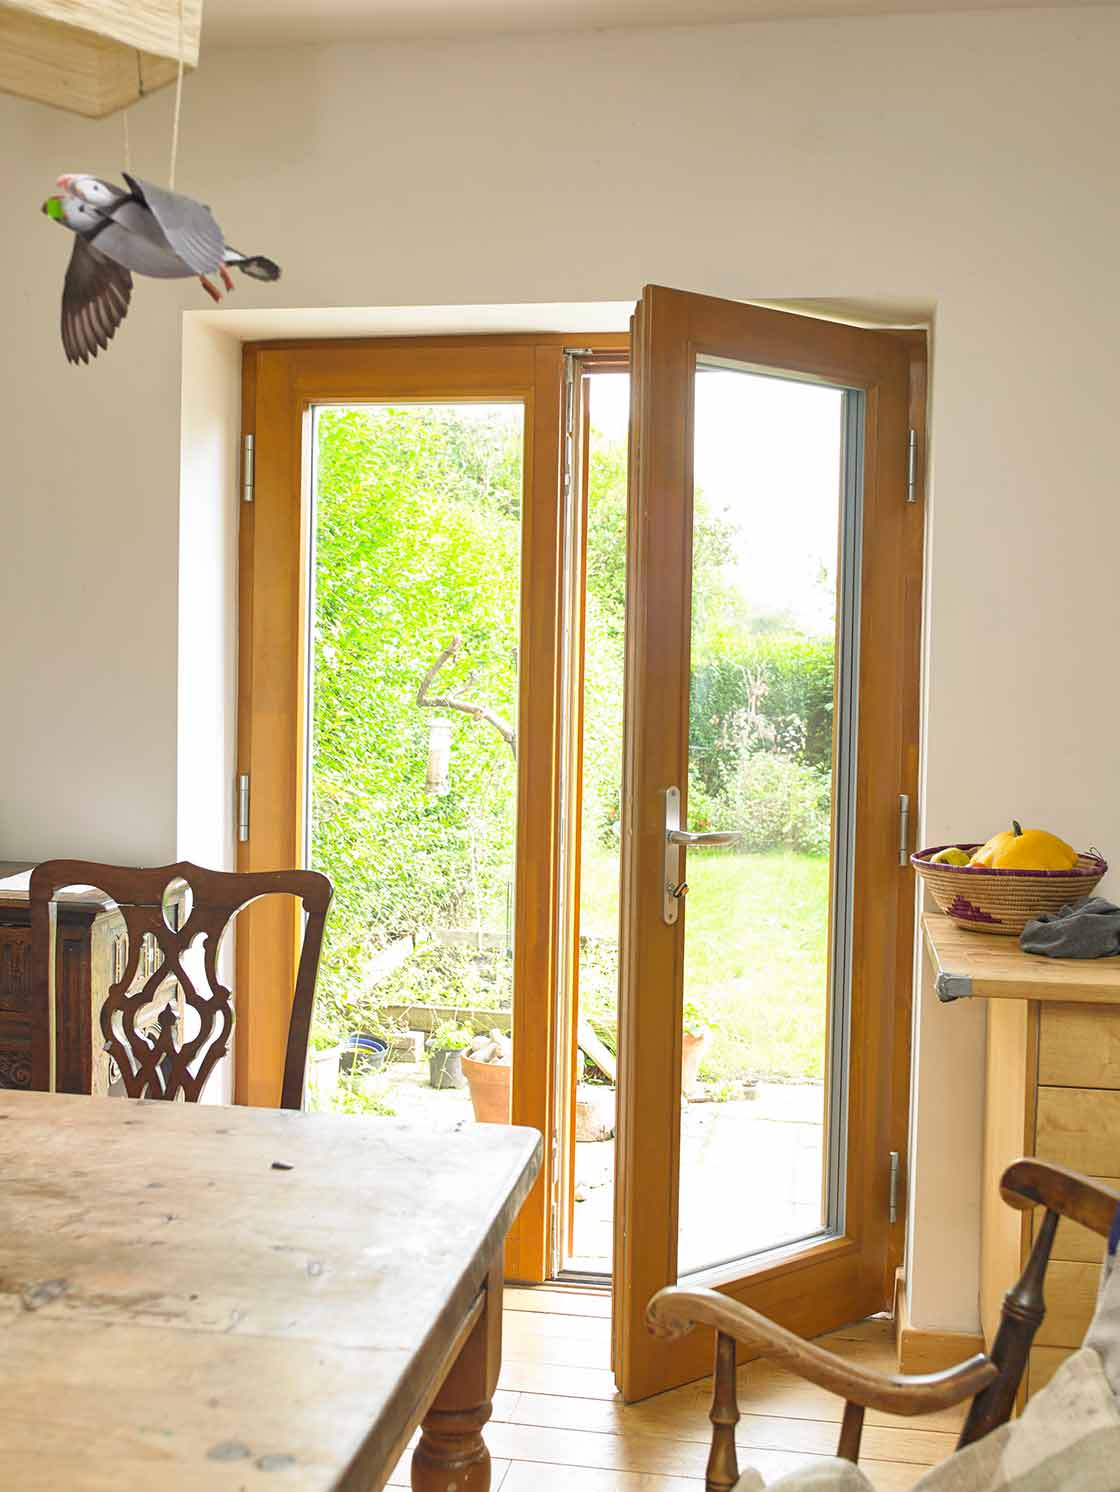
Windows and doors were all replaced with triple glazed high performance timber units from Green Building Store
Windows and doors were all replaced with triple glazed high performance timber units from Green Building Store
-
The windows were hung outside the masonry walls in plywood boxes, within the new external insulation layer, to reduce thermal bridging into the brickwork
The windows were hung outside the masonry walls in plywood boxes, within the new external insulation layer, to reduce thermal bridging into the brickwork
-
Walls are insulated externally with 200mm Stylite platinum EPS
Walls are insulated externally with 200mm Stylite platinum EPS
-
Roof build-up includes plain tiles followed inside by battens with pro clima Solitex taped wind-tightness membrane over counter battens, over Xtratherm Thin-R 100mm boards
Roof build-up includes plain tiles followed inside by battens with pro clima Solitex taped wind-tightness membrane over counter battens, over Xtratherm Thin-R 100mm boards
-
100mm Thermafleece UltraWool between rafters
100mm Thermafleece UltraWool between rafters


https://mail.passive.ie/magazine/upgrade/cheshire-semi-gets-passive-retrofit-for-60k#sigProIda8852d7e9d
Building fabric
Space for insulation in the roof was limited, in order to allow for headroom in the new loft space without raising the ridge line of the roof too much. Thinner insulation was also easier to fix. So, the roof was stripped and 100mm high-performance Xtratherm PIR was installed above the rafters, covered externally with breathable membrane.
Thermafleece sheepwool insulation, meanwhile, was fitted between the 100mm rafters internally, with an intelligent, moisture-controlling Intello airtightness membrane installed underneath this.
The further 50mm of Thermafleece in the service void below this was the only insulation inside the airtightness barrier. “It was important to choose something kind here that wouldn’t off-gas pollutants or irritating fibres,” Chris says.
Given the relatively limited scope to improve the U-value of the roof, other elements needed to work harder to reduce the overall heat demand, Gil Schalom explains. The cavity walls already had a loose fibre fill, but external wall insulation (200mm Graphite EPS, including a Parex EHI render, adhesively fixed to avoid thermal bridging) was needed as well to achieve passive house performance.
I realised that if you were going to retrofit a building it needed doing to the highest standard possible, passive house.
The existing external wall cavities were sealed all the way up at the party wall junction with expanding foam, to constrain the existing insulation and reduce thermal bypass, and the roof overhang was extended at the gable to cover the external insulation — the eaves overhangs were already wide enough.
EPS was also used under the floor – the solid uninsulated concrete was dug up, and a 300mm layer of platinum EPS laid under a concrete slab with 50% ground granulated blast furnace slag. Replacing the lowest course of all the internal brickwork with Foamglas was labour intensive, but relatively straightforward. Meanwhile the external wall insulation was extended down to the footings to complete the insulation.
Airtightness work involved a mixture of broad-brush measures and more detailed, time-consuming ones. Careful sequencing was crucial. The first floor and upstairs ceiling joists were retained, so the end floorboards and plasterboard were removed to access the joist ends, which were taped onto the bare brick, before an internal parge coat of sand, lime and cement was applied right up the full height of the walls.
The Intello vapour control membrane of the roof was lapped down and also taped to the internal brickwork, ready for the plaster. Similarly, the plaster came down over the damp proof membrane (which was covered in Contega tape to ensure the plaster stuck to it) that lapped up from under the ground floor.
Sensible glazing design
Windows and doors were all replaced with triple glazed high performance timber units from Green Building Store. The windows were hung outside the masonry walls in plywood boxes, within the new external insulation layer, to reduce thermal bridging into the brickwork.
The original house actually had very little south glazing — there was just one small window in the gable end, as is standard with semis like this regardless of their orientation. The original plan was for a new large attic window, plus a second new south-facing window at ground floor level. But Chris re-thought this.
He worked out from PHPP that, because heat losses also increase with glazing area, “you do not get a massive net gain from south glazing in the UK”. So, the upper window was reduced in size, and the lower one eliminated altogether.
“If you have a lot of south glazing, particularly the floor-to-ceiling kind, you can require a lot of shading – which in turn adds expense, and we wanted to keep it simple and affordable,” he says.
The two smallish south windows they now have are only shaded by the reveals, but despite last summer’s heat wave, they have had no problems with overheating: “All we needed to do was leave windows open at night when it was warm.”
Green Building Store also helped to design a ventilation layout that fitted in unobtrusively, without any boxing in – for the most part within the eaves (the fan unit is also housed in the eaves, though accessed from the room below). Despite the fact that it is verging on the over-sized, the existing, relatively new and efficient gas boiler has been retained, and the system seems to be coping well.
The house is now very comfortable in both hot and cold weather. “The heating goes on every couple of days on average in the winter,” Chris says.
Economical build
The total expenditure including bought-in labour for this retrofit was around £60,000. This includes the ‘room in roof’ conversion, which even in a very basic form would have required a five figure sum itself to carry out.
Chris hired local tradespeople, and project managed the work on site. However, he and Alex also did a lot of the work themselves. This added up to a considerable amount of the couple’s time – obviously hard to cost, though at more than three days a week for a year, not negligible.
“It’s hard to know how long a professional would have spent and how that would translate into pay, as I’m probably very slow. But on the other hand, the work that I did myself, I know I did very carefully,” Chris says.
For example, the meticulous taping work was carried out by Chris and Alex working alongside joiner Dave Chalmers, based on training and advice (and a preliminary fan check) from airtightness experts Nesthaus.
The care paid off, with a final airtightness of 0.27 air changes per hour achieved. Chris, along with Dave Chalmers, also installed the external wall insulation, with the rendering undertaken by their local plasterer.
This hands-on approach has advantages when you are very clear about the results you want. “I didn’t like the fact that no EWI installers would use a hot wire cutter, they just wanted to cut insulation with a handsaw, which sprays polystyrene far and wide, so it seemed to make sense buying a cutter and doing it ourselves. It was a fairly straightforward job, it just requires attention to detail,” Chris says.
Gil Schalom explains that working this way can have other advantages: “While directly employing tradespeople can be more risky than a fixed price contract, it allows flexibility, enabling a self-builder to vary their own input as they need to. It also avoids the risk factor that contractors less experienced in passive house can sometimes load onto fixed prices.”
“In this case, it paid dividends as Chris was able to spend more time on the specialist time-consuming elements such as the painstaking airtightness detail work, while delegating more standard work to the others. “How he managed to do all this while running a vet’s practice and having a young child is a little beyond me, but it seems to have really paid off.
Gil is pleased and impressed by how economically the build turned out. “For me one of the most remarkable aspects of this build is the shoe-string budget with which it was completed. The design distills the passive house requirements down to their no-frills essence, carefully controlling size and type of glazed elements and calculation of thermal bridges — an optional measure that enables you to fine-tune the amount of insulation to exactly what is needed.”
For Chris, this is a really important achievement – because it shows it is possible for others to follow suit. “People say about deep retrofit — ‘it’s all very well setting those standards if you’ve got loads of money’, but it’s so important to try to make it affordable.”
Chris is not resting on his laurels. Having completed his house (which he describes as a “warm up”), he has embarked on building a new veterinary surgery – to the passive house standard, of course. He is taking the same approach as with his own house – very hands on, project managing and directly employing local tradespeople.
“I would like to see all the technical side of things involved with passive house construction demystified,” he says. “A lot of the so-called specialist jobs such as MVHR, external insulation, window installation and airtightness can be done by a good joiner, plasterer, with guidance and instructions from people like the Green Building Store or the airtightness specialists.
“I’ve just installed an MVHR in the new building with a joiner, who had never seen one before. He’s done the whole job in four days. This makes the whole business much cheaper and more environmentally — and socially — friendly.
“The people we work with are absolutely brilliant,” he says. In Chris’s view, it’s not really about specific passive house experience: “It’s all about the attitude, about whether they are just going to do it as quickly as possible, the way they have always done it, or if they want to listen to the client and follow their priorities.”
With his extremely full days – and recently, many of them spent on a building site – Chris certainly appreciates his comfortable, relaxing home. “Cycling back to our cosy home in the winter, after a hard day at work, feels like a pleasure. Although there is usually no heating on, the warmth hits you as you go in through the front door, and still feels quite magical.”
Selected project details
Architect: Gil Schalom Design
Structural engineer: Intelligent Structural Solutions
Energy consultant: Green Building Store (now 21 degrees)
Project management, passive house consultant: Chris Copeman
Electrical contractor: Kingsley Electrical Services
Airtightness consultant: Nesthaus
Airtightness tester: Richie & Richie
External wall insulation: Styrene
External insulation system: Parex UK
Sheep wool insulation: Thermafleece
Rigid roof insulation: Xtratherm (now Unilin)
Airtightness products: Green Building Store, Ecological Building Systems
Windows & doors: Green Building Store
GGBS cement: Hanson
Gas boiler: Worcester Bosch (already installed)
MVHR: Paul, via Green Building Store
Solar PV: The Greener Group (already installed)
In detail
Building type: 80sqm 1940s cavity wall, brick-built semi-detached house
Location: Rural location near Frodsham, Cheshire
Budget: £60,000
SPACE HEATING DEMAND
Before: 90 kWh/m2/yr
After: 16 kWh/m2/yr
Heat load (after, PHPP): 9 W/m2
Heat loss form factor (PHPP): 2.8
Overheating (PHPP): 0.4%
Primary energy demand (after, PHPP): 111 kWh/m2/yr
No of occupants: 3 (Chris, Alex and their daughter)
Measured energy consumption: 1,228kWh of electricity and 2,125kWh of gas during 2017.
This increased to 2,088kWh electricity and 2,680kWh gas during 2018. Chris says this increase in electricity use was down to his partner Alex returning to work and charging their electric car more often.
Energy bills (measured): Total bill of £330 for electricity & £180 for gas during 2017; £463 for electricity & £196 for gas in for gas in 2018. These figures include standing charges. However, Chris & Alex received a feed-in tariff of approx £1,500 for solar PV generation, making for an estimated profit on energy of £840 in 2018.
Airtightness (at 50 Pascals): 0.27 air changes per hour
Thermal bridging: Inner leaf of brickwork had course of bricks removed and replaced with Foamglas Perinsul strips at level of floor insulation to connect with cavity insulation. This was repeated under retained internal brick walls. Thermal bridges calculated by Green Building Store.
FLOORS
Before: Sub-base followed above by 100mm concrete ground bearing slab (uninsulated), quarry tiles.
After: Existing sub-base followed above by sand blinding, DPM lapped up walls up to 150mm above finished floor level, 300mm platinum EPS insulation, 100mm in-situ reinforced concrete slab with 35mm PIR edge insulation (increased to 60mm next to party walls), oak floor boards reclaimed direct from another property. U-value: 0.101 W/m2K
EXTERNAL WALLS
Before: 102.5mm brick externally, followed inside by 70mm cavity with Supafill 34 silicon-treated glass mineral wool insulation, 102.5mm brick, plaster. U-value: 0.45 W/m2K
After: 200mm Stylite platinum EPS insulation and Parex Lanko EHI mineral render finish externally (adhered), 102.5mm brick, followed inside by 70mm cavity with Supafill 34, 102.5mm brick, cement/lime/sand plaster (full re-plastering). U-value: 0.113W/m2K. (EWI steps down to 180mm XPS below DPC, taken down to 30cm below ground level).
Party walls (ground & first floor): Chimney breasts removed on ground. 100mm enhanced Thermafleece sheep wool insulation between timber studs, followed inside by airtightness membrane, plasterboard. U-Value: 0.290 W/m2K
Party walls (second floor): 500mm reused loft insulation between and behind timber studs, followed inside by airtightness membrane, plasterboard. U-value: 0.075 W/m2K
ROOF
Before: Plain tiles on battens with mineral felt underneath. 300mm mineral wool insulation on the flat between roof joists and above. Plasterboard ceiling internally. U-value: 0.15 W/m2K
After: Plain tiles reused & supplemented with secondhand tiles to match, followed inside by battens with pro clima Solitex taped wind-tightness membrane over counter battens, over Xtratherm Thin-R 100mm boards, 100mm Thermafleece UltraWool between rafters, 8mm OSB, pro clima Intello membrane taped with pro clima tapes, 50mm service void with Thermafleece UltraWool, plasterboard skimmed. U-value: 0.12 W/m2K
WINDOWS & DOORS
Before: Timber front door. Double glazed windows and back door. U-Value: 2 W/m2K
New triple glazed windows: Green building Store Ultra Solid timber windows and doors, inward opening, mounted 100mm proud of masonry into EWI with ply surrounds. EWI lapped 50mm over frames to reduce thermal bridging. Uw = 0.75, Overall installed U-value of 0.80 W/m2K.
Heating system: Existing Worcester Bosch GreenStar 30SI condensing gas combi boiler, originally with radiators in every room, reused after with just three radiators.
VENTILATION
Before: No ventilation system. Reliant on infiltration, chimney and opening of windows for air changes.
After: Paul Focus 200 heat recovery ventilation system. Passive House Institute certified to have heat recovery rate of 89%. Spiral bound galvanised steel ductwork by Lindab.
Electricity: 4kw Sharp Photovoltaic array split east west system reinstalled. Average annual output of 3,000kW
Green materials: Secondhand mahogany conservatory purchased and restored, roofed with Welsh cedar shingles. Clay based Earthborn paint used inside, 50% GGBS cement used in floor, insulation off cuts from EWI used in conservatory floor, existing loft insulation reused in party wall. Glulam beams, re-used oak timber from local pub and local school gym, old chimney brickwork reused for paving.
Image gallery


https://mail.passive.ie/magazine/upgrade/cheshire-semi-gets-passive-retrofit-for-60k#sigProIdb4ba6670b2